
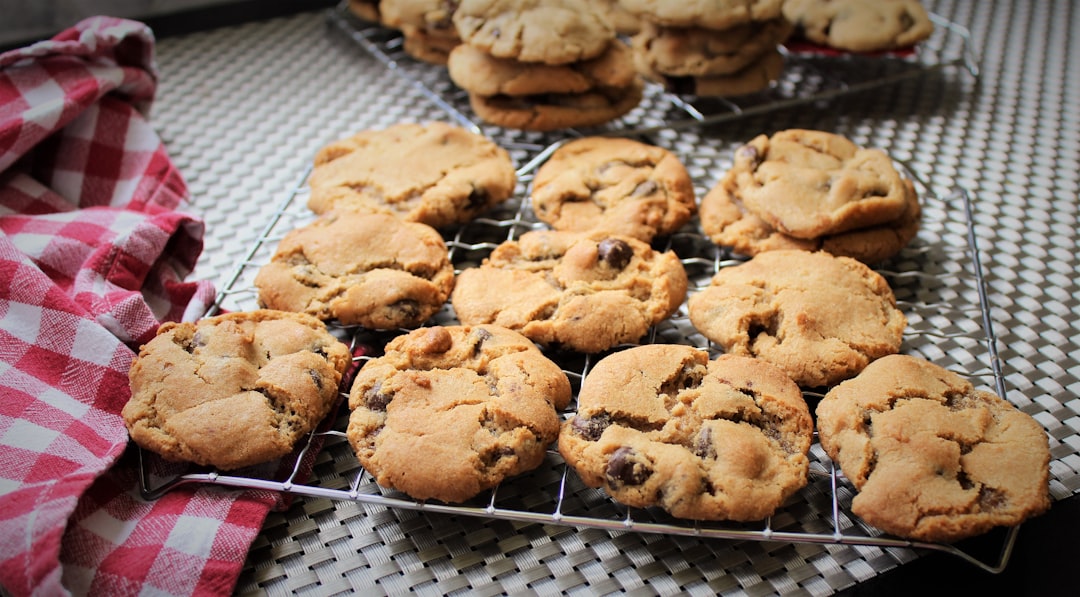
The chocolate chip cookie occupies a singular position in the world of baking. It is simultaneously one of the simplest recipes a person can attempt and one of the most difficult to perfect. The ingredient list is short and familiar: butter, sugar, eggs, flour, and chocolate. Yet the interplay between these components, influenced by temperature, timing, technique, and ratio, produces an astonishing range of outcomes. The same basic recipe can yield cookies that are crispy, cakey, flat, puffy, chewy, or crumbly depending on decisions made at every stage of the process.
This guide focuses specifically on achieving chewy perfection: a cookie with a slightly crisp edge that gives way to a tender, fudgy center, laced with pools of melted chocolate and carrying a complex butterscotch-toffee flavor. Every recommendation here is grounded in food science, tested through repeated baking sessions, and explained so you understand not just what to do but why each step matters. By the end, you will have both a reliable recipe and the knowledge to troubleshoot and customize your cookies with confidence.
The Science of Chewiness in Cookies
Chewiness in a cookie results primarily from two factors: gluten development and moisture retention. Gluten, the protein network formed when flour is mixed with liquid and agitated, creates the structural matrix that gives chewy baked goods their characteristic pull and stretch. In bread, extensive gluten development produces strong chew. In cookies, we want moderate gluten development: enough to create structure and chew, but not so much that the cookie becomes tough.
Moisture retention works alongside gluten to produce chewiness. A cookie that dries out completely during baking becomes crispy rather than chewy. Ingredients that attract and hold water, specifically brown sugar (which contains hygroscopic molasses), egg yolks (which contain emulsifying fats), and honey or corn syrup (which are invert sugars), all contribute to a moister final product that stays chewy for days after baking.
The King Arthur Baking Company has published extensive research on cookie chemistry, demonstrating that the ratio of brown sugar to white sugar is the single most impactful variable in determining cookie texture. Their findings align with professional pastry science: more brown sugar produces chewier cookies, while more white sugar produces crispier ones.
Ingredient Analysis: Why Each Component Matters
Butter: Temperature Changes Everything
Butter serves three functions in cookies: flavor, tenderness, and spread. The temperature at which you incorporate butter into the dough determines which of these functions dominates. Cold butter (straight from the refrigerator) creates pockets of solid fat that melt during baking, producing steam and lift, resulting in a thicker, cakier cookie. Melted butter integrates fully into the dough, coating flour proteins and producing a denser, chewier cookie with more spread. Room-temperature butter (65 to 68 degrees Fahrenheit) creates maximum air incorporation during creaming, yielding a lighter, more evenly textured cookie.
For chewy cookies, the optimal approach is to use butter that has been melted and then cooled to approximately 90 degrees Fahrenheit. This temperature allows the butter to emulsify smoothly with the sugars and eggs without cooking the egg proteins on contact. The melted state ensures maximum gluten development by allowing water in the butter to hydrate the flour directly, while the slight cooling prevents the dough from becoming too warm and slack.
Sugar: The Brown-to-White Ratio
White granulated sugar dissolves during baking and re-crystallizes as the cookie cools, creating crispness. Brown sugar contains 3 to 7 percent molasses depending on whether it is light or dark, and this molasses is hygroscopic, meaning it actively attracts and retains moisture from the environment. A cookie made with all brown sugar will be soft and chewy but may lack the crisp edges that provide textural contrast.
The ideal ratio for chewy cookies with crisp edges is approximately 60 percent brown sugar to 40 percent white sugar. In practical terms, this means using about three-quarters cup of packed brown sugar and half a cup of granulated white sugar for a standard batch. This ratio delivers the butterscotch depth of brown sugar while maintaining enough white sugar to create that satisfying thin layer of crispness at the cookie’s perimeter.
Eggs: Yolks Drive Chewiness
Whole eggs contribute both structure (from proteins in the white) and richness (from fats and emulsifiers in the yolk). For chewier cookies, the balance should favor yolks. The standard approach uses one whole egg plus one additional egg yolk. The extra yolk adds fat and lecithin, which improves emulsification and moisture retention. It also contributes to a more golden color and richer flavor. Removing the extra white reduces the protein that would otherwise create a cakier, drier crumb.
Flour: Protein Content Determines Structure
All-purpose flour with a protein content of 10 to 12 percent is the standard choice for cookies. Bread flour (12 to 14 percent protein) produces noticeably chewier cookies due to increased gluten formation but can cross the line into toughness if the dough is overmixed. Cake flour (7 to 9 percent protein) produces tender, delicate cookies that lack chew. For the recipe in this guide, standard unbleached all-purpose flour produces the best results. If you want slightly more chew without risking toughness, replace a quarter cup of all-purpose flour with bread flour.
Cookie Texture Guide
| Variable | Crispy Cookie | Chewy Cookie | Cakey Cookie |
|---|---|---|---|
| Butter State | Room temperature, creamed | Melted, cooled to 90F | Cold, cut into pieces |
| Sugar Ratio | Mostly white sugar | 60% brown, 40% white | Equal parts |
| Egg Composition | Whole eggs only | 1 whole + 1 extra yolk | Whole eggs + baking powder |
| Flour Type | All-purpose | AP or AP/bread blend | Cake flour or AP |
| Mixing Time | Moderate | Minimal after flour | Thorough creaming |
| Bake Time | Until fully golden | Remove when edges set but center soft | Until just set |
| Rest Time | None needed | 24-72 hours refrigerated | 30 minutes |
| Thickness | Thin and spread | Medium with slight dome | Thick and puffy |
The Tested Recipe: Chewy Chocolate Chip Cookies
The Ultimate Chewy Chocolate Chip Cookies
Prep Time: 20 minutes | Rest Time: 24 to 72 hours (recommended) | Bake Time: 11 minutes | Yield: 24 cookies
Ingredients
- 2 1/4 cups (280 g) unbleached all-purpose flour
- 1 teaspoon baking soda
- 1 teaspoon fine sea salt
- 1 cup (2 sticks / 227 g) unsalted butter, melted and cooled to 90F
- 3/4 cup (150 g) packed dark brown sugar
- 1/2 cup (100 g) granulated white sugar
- 1 large egg, at room temperature
- 1 large egg yolk, at room temperature
- 2 teaspoons pure vanilla extract
- 1 1/2 cups (255 g) high-quality chocolate chips or chopped chocolate (a mix of semisweet and bittersweet)
- Flaky sea salt for finishing (Maldon or similar)
Instructions
- Whisk flour, baking soda, and fine sea salt together in a medium bowl. Set aside.
- In a large bowl, combine melted butter with both sugars. Whisk vigorously for about 2 minutes until the mixture appears slightly lighter in color and the sugars are fully dissolved. This step develops flavor complexity by creating toffee-like compounds.
- Add the whole egg, egg yolk, and vanilla extract. Whisk until the mixture is smooth, thick, and ribbon-like, approximately 30 seconds.
- Add the flour mixture to the wet ingredients in two additions, folding gently with a spatula after each. Mix only until no dry streaks of flour remain. Do not overmix. The dough will be soft and slightly glossy.
- Fold in chocolate chips until evenly distributed.
- Cover the bowl tightly with plastic wrap, pressing it directly against the surface of the dough. Refrigerate for a minimum of 24 hours and up to 72 hours. This rest period is not optional for best results.
- When ready to bake, preheat oven to 350 degrees Fahrenheit. Line baking sheets with parchment paper.
- Scoop dough into 2-tablespoon portions (approximately 45 g each). Arrange on prepared sheets with 3 inches between each cookie to allow for spread.
- Bake for 10 to 12 minutes, rotating the pan halfway through. The cookies are done when the edges are set and lightly golden but the centers still appear slightly underdone and glossy. They will continue to set as they cool.
- Remove from oven and immediately sprinkle each cookie with a few flakes of finishing salt. Allow cookies to cool on the baking sheet for 5 minutes, then transfer to a wire rack.
The Critical Rest Period: Why 24 Hours Makes a Difference
Resting cookie dough in the refrigerator is the single most transformative technique you can apply, and it is the step most home bakers skip. During refrigeration, several important processes occur simultaneously. The flour fully hydrates, absorbing moisture from the butter and eggs, which results in a drier dough that spreads less during baking and produces a thicker cookie. The gluten network relaxes, leading to a more tender bite. And enzymatic browning begins breaking down proteins and starches into simpler sugars and amino acids, which participate more readily in Maillard reactions during baking.
The practical result is dramatic. A cookie baked immediately after mixing will taste good. The same dough baked after 24 hours will taste noticeably better: deeper butterscotch flavor, more complex chocolate character, and improved textural contrast between the crisp edge and chewy center. At 48 to 72 hours, the differences intensify further. The team at Serious Eats conducted controlled taste tests confirming that rested dough consistently produced cookies rated higher on flavor complexity, chewiness, and visual appeal by blind tasters.
Chocolate Selection: Chips Versus Chopped Bars
Standard chocolate chips are engineered to hold their shape during baking. They contain less cocoa butter than bar chocolate and include stabilizers that prevent them from fully melting. This produces predictable, uniform chocolate distribution but sacrifices the dramatic puddles and streaks of melted chocolate that characterize artisan cookies.
For superior results, use a combination of chocolate chip formats. Chop a high-quality chocolate bar (such as Guittard, Valrhona, or Callebaut) into irregular pieces ranging from fine shards to large chunks. The fine pieces melt into the dough during baking, creating chocolate veins throughout. The large chunks remain as pockets of intense, gooey chocolate. Combine semisweet (55 to 60 percent cacao) with a smaller proportion of bittersweet (70 percent cacao) for complexity that balances the sweetness of the dough.
Baking Technique: Oven Position, Timing, and the Pan Bang
Position your oven rack in the center position. If baking two sheets simultaneously, use the upper-middle and lower-middle positions and swap sheets halfway through. This accounts for hot spots that every home oven contains.
Timing is precise and unforgiving with cookies. At 350 degrees Fahrenheit, the difference between a chewy cookie and an overbaked one can be as little as 60 seconds. Set a timer and check at the minimum time. The cookies should look slightly underdone when you remove them. The residual heat from the baking sheet continues cooking the centers for another 2 to 3 minutes, bringing them to the ideal just-set texture.
The pan bang technique, popularized by baker Sarah Kieffer, produces the distinctive rippled, crackly surface associated with bakery-style cookies. Two minutes before the cookies are done, open the oven and firmly bang the baking sheet against the oven rack. This deflates the cookies slightly and creates ridges in the surface that firm up into an appealing texture. Repeat once more 30 seconds later if desired. This is optional but produces a visually stunning result.
Troubleshooting Common Cookie Problems
Cookies spread too thin: The butter was too warm when mixed, or the dough was not chilled sufficiently. Always cool melted butter to 90 degrees (barely warm to the touch) and refrigerate dough for at least 24 hours. Also verify your baking soda is fresh. Expired leavening can cause excessive spread.
Cookies are too cakey: Usually caused by too much flour (always measure by weight, not volume), too many eggs, or too much leavening. The recipe calls for one egg plus one yolk. Using two whole eggs creates a cakier texture. Also ensure you are using baking soda, not baking powder, which would create additional lift.
Cookies are tough: Overmixing after adding flour develops excessive gluten. Fold the flour in gently and stop the moment no dry streaks remain. A few small lumps are acceptable and preferable to a tough cookie.
Cookies taste flat (not in shape, in flavor): The most likely culprit is insufficient salt or low-quality vanilla extract. Use genuine vanilla extract, not imitation, and do not reduce the salt. Salt in cookies is not just about saltiness; it suppresses bitterness and amplifies every other flavor in the dough. The finishing flaky salt is equally important, adding bursts of salinity that make the chocolate and butterscotch flavors pop.
Nutrition Information Per Cookie
| Nutrient | Amount | % Daily Value |
|---|---|---|
| Calories | 210 kcal | 10% |
| Total Fat | 11 g | 14% |
| Saturated Fat | 7 g | 35% |
| Cholesterol | 30 mg | 10% |
| Sodium | 150 mg | 7% |
| Total Carbohydrates | 27 g | 10% |
| Dietary Fiber | 1 g | 4% |
| Sugars | 16 g | — |
| Protein | 2.5 g | 5% |
Storing and Freezing Cookies and Dough
Baked cookies store well at room temperature in an airtight container for up to 5 days. Place a slice of bread in the container; the cookies will absorb moisture from the bread, staying soft and chewy while the bread goes stale. Replace the bread slice every two days.
For longer storage, freeze baked cookies in a single layer until solid, then transfer to freezer bags. They maintain quality for up to 3 months. Thaw at room temperature for 15 minutes, or warm in a 300-degree oven for 3 to 4 minutes to restore just-baked texture.
Raw cookie dough freezes exceptionally well. Scoop dough into portioned balls, freeze on a sheet pan, then transfer to freezer bags. Bake directly from frozen at 350 degrees, adding 2 to 3 minutes to the bake time. This method allows you to bake exactly as many cookies as you want, whenever you want, with no waste and minimal effort. Having frozen dough portioned and ready is arguably the best way to ensure you always have fresh-baked cookies available.
Variations and Adaptations
The base recipe adapts readily to personal preferences. Replace a quarter cup of all-purpose flour with Dutch-process cocoa powder for double-chocolate cookies. Add a cup of toasted, roughly chopped pecans or walnuts for textural contrast and nutty depth. Substitute browned butter for melted butter to add a pronounced nutty, toffee-like flavor that elevates the cookies from excellent to extraordinary. Brown the butter by cooking it over medium heat until the milk solids turn amber and smell like hazelnuts, approximately 5 minutes, then cool to 90 degrees before proceeding with the recipe.
For those exploring the broader world of baking technique, our dessert ideas collection covers complementary topics from brownies to tarts. And if understanding the why behind recipe instructions appeals to you, our cooking tips archive dives deep into the science and technique that transform ordinary recipes into reliably excellent ones.
Frequently Asked Questions
Why do my chocolate chip cookies come out flat every time?
Flat cookies are almost always caused by one of three issues: butter that was too warm when incorporated into the dough, insufficient flour (measure by weight for accuracy), or expired baking soda. Baking soda loses potency after opening, typically within 6 months. Test yours by dropping a small amount into vinegar. If it does not fizz vigorously, replace it. Additionally, ensure you are chilling the dough for at least 24 hours, which significantly reduces spread.
Can I use salted butter instead of unsalted in cookies?
You can, but you should reduce or eliminate the added fine sea salt in the recipe to compensate. Salted butter contains approximately a quarter teaspoon of salt per stick, but the amount varies between brands, making it difficult to control total salt content precisely. Using unsalted butter and adding salt separately gives you exact control over seasoning, which matters more in cookies than in most savory cooking. Keep the finishing flaky salt regardless, as its role is textural and flavor-accenting rather than structural.
What is the difference between baking soda and baking powder in cookies?
Baking soda is a pure leavening agent that requires an acid (brown sugar, chocolate, buttermilk) to activate. It promotes browning and spread. Baking powder contains its own acid and produces more lift with less spread, resulting in cakier cookies. This recipe uses baking soda exclusively because the brown sugar provides the necessary acid, and the resulting modest lift and enhanced browning produce the ideal chewy texture with attractive golden color.
How do I know when chocolate chip cookies are done baking?
Look for edges that are set and lightly golden while the center still appears slightly glossy and underdone. The center should jiggle slightly when you gently shake the pan. If the center looks fully set and matte while still in the oven, the cookies are already overbaked for chewy results. They will firm up considerably as they cool on the sheet. Using an instant-read thermometer, the center of a perfectly chewy cookie registers approximately 195 to 200 degrees Fahrenheit when removed from the oven.
The USDA notes that cookie dough containing raw eggs should reach safe internal temperatures during baking, which this recipe achieves when following the stated bake times. Consuming raw cookie dough carries risk from both raw eggs and uncooked flour.
Disclaimer: Nutritional information is approximate and calculated using standard ingredient values. Actual nutrition content varies based on specific brands, chocolate types, and portion sizes. This article is intended for informational and educational purposes. Individuals with food allergies or specific dietary requirements should verify all ingredients against their personal restrictions. Baking results may vary depending on oven calibration, altitude, and humidity. Consult a healthcare professional for personalized dietary guidance.